Upscaling software makes a small picture bigger and tries to make it look sharp. Real-ESRGAN is an open-source model for this, and a portable build runs on many graphics cards without a Python or CUDA setup. That makes it a reasonable local option for old, soft, or compressed footage.
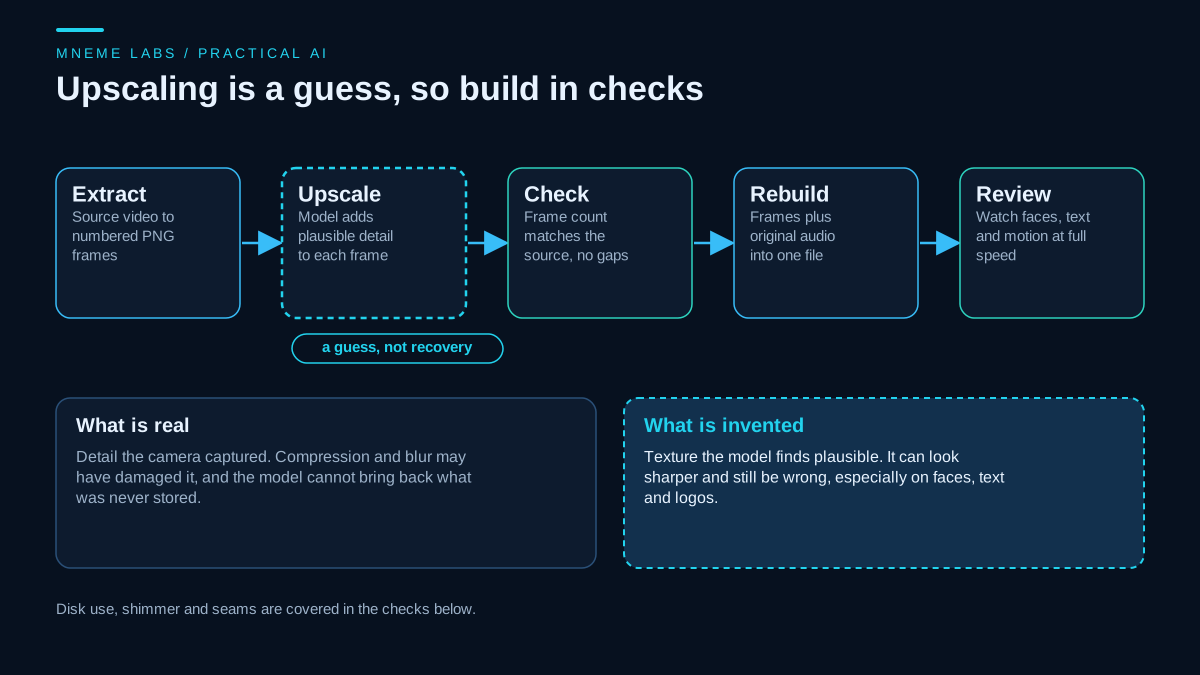
It also needs a plain statement up front. Upscaling does not recover detail that the camera never stored. The model adds texture that it finds plausible. That can look much better than a blurry resize, and it can also be wrong on faces, text, and logos. This guide covers a workflow that treats the result as a draft: sample first, check the frames, rebuild carefully, and review before delivery. It sits alongside the local guides on frame interpolation and background removal.
What the tools are, and their licenses
The main Real-ESRGAN repository describes its aim as practical algorithms for general image and video restoration, and says the model was trained with purely synthetic data. Its LICENSE file is BSD 3-Clause. The ncnn Vulkan build packages the model as a portable program. Its LICENSE file is the MIT license. The main README says the portable executables cover Intel, AMD, and Nvidia GPUs, include the binaries and models they need, and require no CUDA or PyTorch environment. The main repository also offers a Python route that needs Python 3.7 or newer and PyTorch 1.7 or newer. This guide uses the portable tool.
Three notes from those READMEs shape the rest of this guide:
- The ncnn README's usage text shows
realesr-animevideov3as the default model name, while the main README listsrealesrgan-x4plusas the default for the executable. The docs disagree, so always pass-nyourself. - The main README says the executable crops each image into tiles, processes them separately, and stitches them together, which may introduce block inconsistency and slightly different results from the PyTorch version. It also says the executable does not support every Python option, such as
outscale. - The ncnn README's to-do list includes a known bug: some PCs output black images. Its advice for crashes or errors is to update your GPU driver.
Do the scale arithmetic first
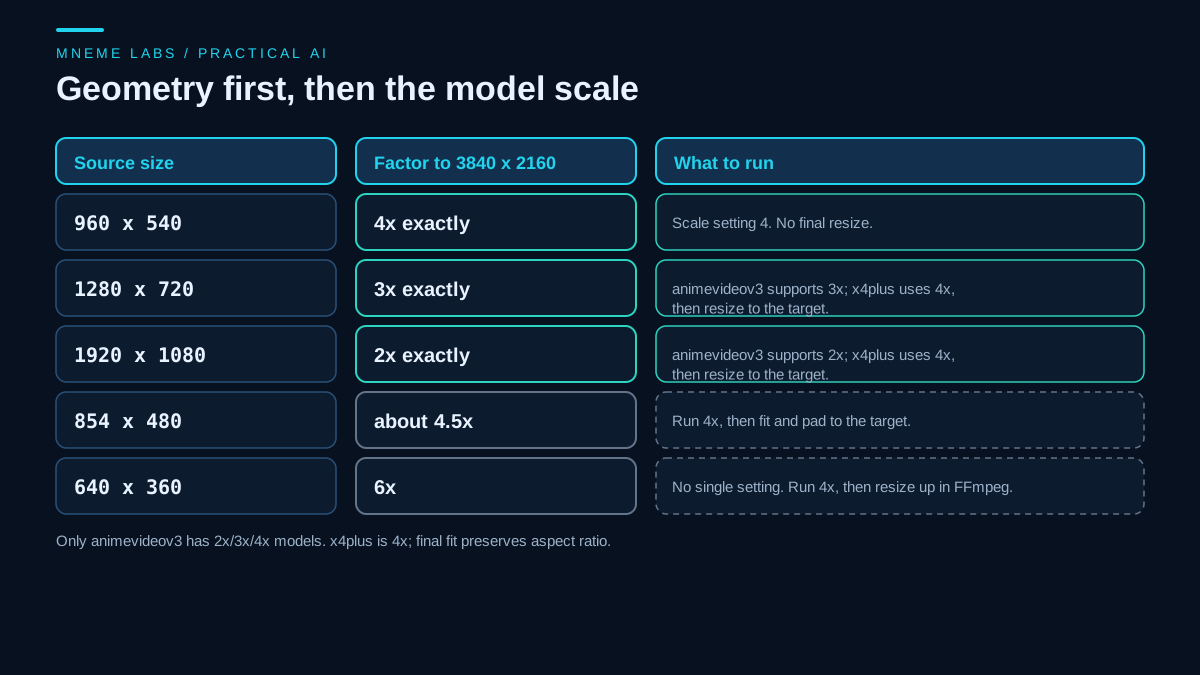
The target here is 3840 by 2160, often called UHD 4K. A 960 by 540 source needs a mathematical factor of 4, 1280 by 720 needs 3, and 1920 by 1080 needs 2. Those ratios are not interchangeable model settings. The ncnn tool's model-loading code selects separate 2x, 3x and 4x files only for realesr-animevideov3. The general-image realesrgan-x4plus model used below is a 4x model: run it with -s 4, then resize its output to the target with FFmpeg. Do not choose an animation model for live footage merely to get a convenient factor.
Check the first output frame before committing to the whole clip. The rebuild step below fits the image into a 3840 by 2160 canvas and pads any remaining space, preserving its aspect ratio instead of stretching it. The helper expects square pixels and a constant frame rate. Normalize anamorphic or variable-frame-rate sources before extracting frames; a numbered image sequence does not preserve their original timing or pixel aspect metadata.
A frame-by-frame workflow
The workflow has five stages: extract numbered frames, upscale them, check the sequence, rebuild with the source audio, and review.
Extract. Use a pass-through frame mode so FFmpeg does not duplicate or drop frames while writing the sequence. The FFmpeg documentation uses -fps_mode passthrough in its tile filter example to prevent frames from being duplicated.
mkdir frames upscaled
ffmpeg -i input.mp4 -fps_mode passthrough frames/frame_%08d.png
Upscale. Name the model and the scale explicitly. The README lists four models: realesrgan-x4plus and realesrnet-x4plus for general images, realesrgan-x4plus-anime for anime images, and realesr-animevideov3 for animation video. Use an animation model only on animation. The input path may be a directory, so one call handles the whole folder.
realesrgan-ncnn-vulkan -i frames -o upscaled -n realesrgan-x4plus -s 4 -f png
The -t option sets the tile size, and the README says a smaller value reduces GPU memory use. The -f option accepts png, jpg, or webp, and the README says png and webp are both losslessly encoded, with webp generally smaller. If you pick webp to save disk, confirm that your FFmpeg build reads webp frame sequences before you commit to a long run. These commands come from the README and were not run for this article, since the tool and its models were not installed here.
Check, then rebuild. Most failures in this kind of workflow are plumbing, not model quality: a wrong frame rate that drifts the audio, a missing frame that silently shortens the video, or a disk that fills halfway. The helper below handles those. It reads the exact frame rate as a fraction instead of rounding it, counts the real frames, finds gaps and extras in a frame folder, estimates disk use from a few real output frames, and refuses to rebuild when the sequence does not match the source. All FFmpeg calls use argument lists.
"""upscale_prep.py: plan, sanity-check and rebuild a frame-by-frame upscale. Standard library plus FFmpeg.

  python upscale_prep.py plan input.mp4                    -> size, exact frame rate, frame count, scale hint
  python upscale_prep.py check frames_dir EXPECTED_COUNT   -> missing or extra frame numbers
  python upscale_prep.py estimate sample_dir TOTAL_FRAMES  -> disk estimate from a few real output frames
  python upscale_prep.py rebuild upscaled_dir input.mp4 out.mp4

Frame files are expected to be named frame_00000001.png and so on (8 digits, starting at 1).
All commands run without a shell.
"""
import json
import os
import re
import subprocess
import sys
from fractions import Fraction

TARGET = (3840, 2160)


def run(cmd):
    r = subprocess.run(cmd, capture_output=True, text=True)
    if r.returncode != 0:
        raise RuntimeError("%s failed (exit %d):\n%s" % (cmd[0], r.returncode, r.stderr[-400:]))
    return r.stdout


def probe(path):
    out = run(["ffprobe", "-v", "error", "-show_entries",
               "stream=codec_type,width,height,r_frame_rate,avg_frame_rate,sample_aspect_ratio:format=duration",
               "-of", "json", path])
    data = json.loads(out)
    video = next(s for s in data["streams"] if s["codec_type"] == "video")
    return video, any(s["codec_type"] == "audio" for s in data["streams"]), float(data["format"]["duration"])


def count_frames(path):
    out = run(["ffprobe", "-v", "error", "-select_streams", "v:0", "-count_frames",
               "-show_entries", "stream=nb_read_frames", "-of", "csv=p=0", path])
    return int(out.strip())


def plan(path):
    v, has_audio, duration = probe(path)
    w, h = v["width"], v["height"]
    r, avg = Fraction(v["r_frame_rate"]), Fraction(v["avg_frame_rate"])
    info = {"width": w, "height": h, "fps": str(r), "has_audio": has_audio,
            "square_pixels": v.get("sample_aspect_ratio") in (None, "N/A", "0:1", "1:1"),
            "frames": count_frames(path),
            "variable_frame_rate_suspected": abs(float(r - avg)) > 0.01 * float(r)}
    fx, fy = Fraction(TARGET[0], w), Fraction(TARGET[1], h)
    if fx == fy and fx.denominator == 1 and 2 <= fx <= 4:
        info["scale_hint"] = "geometric factor %dx; x4plus still runs at 4x, then fits to the target" % fx
    else:
        info["scale_hint"] = "no exact whole-number factor; use a 4x model, then resize with FFmpeg"
    return info


def check(frames_dir, expected):
    nums = sorted(int(m.group(1)) for f in os.listdir(frames_dir)
                  if (m := re.fullmatch(r"frame_(\d{8})\.png", f)))
    want = set(range(1, expected + 1))
    return {"found": len(nums), "missing": sorted(want - set(nums))[:20], "extra": sorted(set(nums) - want)[:20]}


def estimate(sample_dir, total):
    sizes = [os.path.getsize(os.path.join(sample_dir, f)) for f in os.listdir(sample_dir) if f.endswith(".png")]
    if not sizes:
        raise ValueError("no PNG files in %s" % sample_dir)
    avg = sum(sizes) / len(sizes)
    return {"sample_frames": len(sizes), "avg_mb": round(avg / 1e6, 2), "total_gb": round(avg * total / 1e9, 1)}


def rebuild_cmd(upscaled_dir, source, out, fps, has_audio):
    cmd = ["ffmpeg", "-y", "-hide_banner", "-loglevel", "error", "-framerate", str(fps),
           "-i", os.path.join(upscaled_dir, "frame_%08d.png"), "-i", source,
           "-map", "0:v:0"]
    if has_audio:
        cmd += ["-map", "1:a:0", "-c:a", "copy"]
    fit = "scale=%d:%d:flags=lanczos:force_original_aspect_ratio=decrease:force_divisible_by=2,pad=%d:%d:(ow-iw)/2:(oh-ih)/2,setsar=1" % (*TARGET, *TARGET)
    return cmd + ["-vf", fit, "-c:v", "libx264", "-crf", "18",
                  "-pix_fmt", "yuv420p", out]


if __name__ == "__main__":
    a = sys.argv[1:]
    if len(a) == 2 and a[0] == "plan":
        print(json.dumps(plan(a[1]), indent=2))
    elif len(a) == 3 and a[0] == "check":
        print(json.dumps(check(a[1], int(a[2]))))
    elif len(a) == 3 and a[0] == "estimate":
        print(json.dumps(estimate(a[1], int(a[2]))))
    elif len(a) == 4 and a[0] == "rebuild":
        info = plan(a[2])
        if info["variable_frame_rate_suspected"] or not info["square_pixels"]:
            sys.exit("normalize the source to constant frame rate and square pixels, then re-extract frames")
        problems = check(a[1], info["frames"])
        if problems["missing"] or problems["extra"]:
            sys.exit("refusing to rebuild: frame sequence does not match the source: %s" % json.dumps(problems))
        run(rebuild_cmd(a[1], a[2], a[3], info["fps"], info["has_audio"]))
        print("wrote", a[3])
    else:
        sys.exit(__doc__)
This script was tested with FFmpeg 7.1.1 on a synthetic 720p test pattern at 30000/1001 frames per second with a sine-wave audio track. Real-ESRGAN was replaced by a plain FFmpeg resize as a stand-in, so the test covers the plumbing and not the model. The results were:
planreported 1280 by 720, a rate of 30000/1001, 59 real frames, audio present, and a geometric 3x factor to 4K. That does not mean the x4plus model can run at 3x.- Estimating the frame count as duration times frame rate gives 60 here, but the file holds 59 frames, so the script counts real frames instead.
- When one frame was deleted from the upscaled folder, FFmpeg's image reader stopped at the gap and the video came out shorter, with only an input/output error line on stderr that a casual script would miss. The script's check caught it and refused to rebuild, listing the missing numbers.
- With a complete folder, the rebuilt file had 59 frames, 3840 by 2160 pixels, the 30000/1001 rate, and an AAC audio track.
The frame rate matters. Typing 30 for a 29.97 source (30000/1001) makes the picture run slightly fast against the audio, and the error grows with length. Reading the fraction avoids that rounding error on constant-frame-rate footage. The helper's rate comparison is only a warning heuristic: equal reported average and nominal rates do not prove constant timing. For phone or screen recordings, check frame timestamps or normalize to constant frame rate first. Keep the original when doing so.
Disk space deserves a number before you start
An uncompressed 3840 by 2160 frame at 8 bits per channel is about 24.9 million bytes. PNG compresses it, but by an amount that depends entirely on the picture. In the synthetic test above, frames averaged about 1.6 MB because a test pattern is very simple. Real footage with grain or texture compresses far worse. Do not use that figure for planning.
Instead, upscale five real frames from the middle of your clip, run the estimate command on that folder, and multiply. A hypothetical example: a five-minute clip at 29.97 frames per second has 8,991 frames. If the real average came out at 10 MB, that is about 90 GB of frames, plus the original frames, before the final encode. If that does not fit, process the clip in segments and delete finished frames after each segment is rebuilt.
Problems to look for in the sample
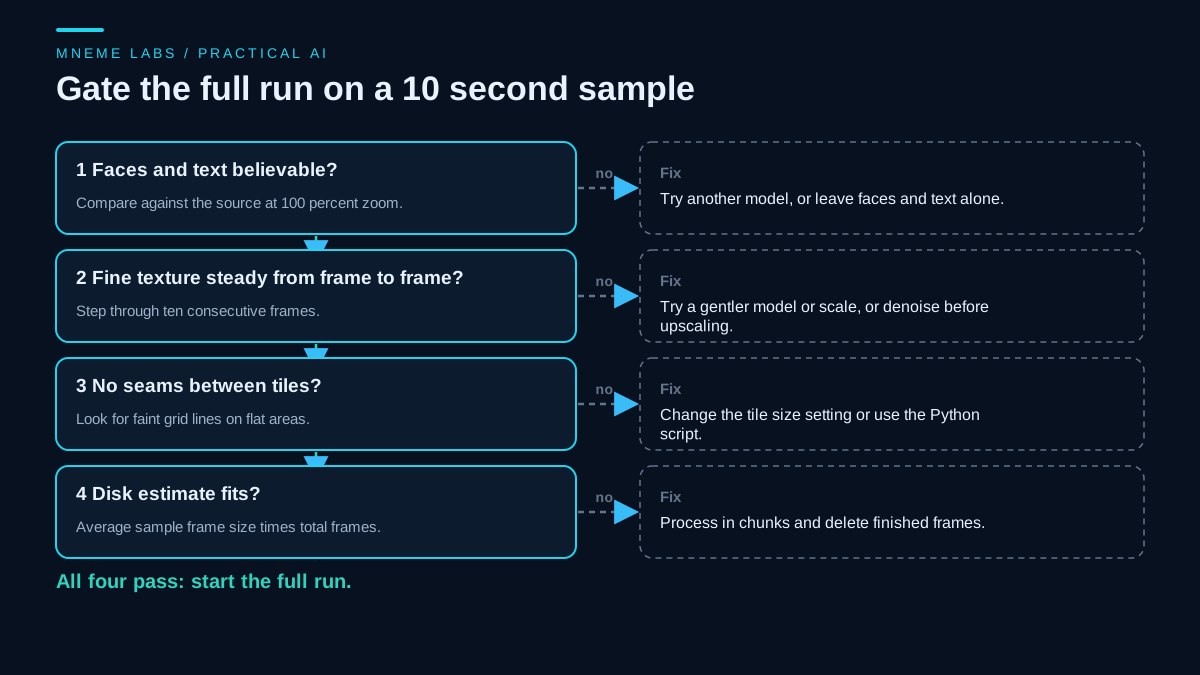
Run a 10 second sample first, ideally including a face, some text, and a moving shot. Then look for these.
- Invented detail. Faces, signs, and logos are where a wrong guess is most visible. Compare against the source at 100 percent zoom. If a face looks like a different person or a sign reads differently, that scene needs another approach or should be left alone.
- Shimmer between frames. The tool works on one image at a time, so a fine texture such as hair, foliage, or fabric can change slightly from frame to frame. Step through ten consecutive frames and then watch the shot at full speed.
- Tile seams. Because of the tile approach the README describes, look for faint grid lines on flat areas such as skies and walls. A different tile size may change them.
- Over-sharpening. A clean source can come out harsh. A modest factor, or a plain Lanczos resize, may be the better choice for footage that is already sharp.
- The wrong model. An animation model on live action can make skin and edges look artificial. Test both on the sample when you are unsure.
When not to upscale
Some projects are better left at their original size. If the audience watches on a phone, the gain from 1080p to 4K is small and the file is far bigger. If the footage is interlaced, deinterlace it first, since FFmpeg provides filters such as yadif and bwdif for that. If the source is HDR, check how colors survive each step before you process a whole library. If the original is heavily compressed and noisy, cleaning the noise first often helps more than a larger factor. And if the value of the footage is archival, keep the untouched original next to any upscaled copy so the enhancement is a labeled derivative, not a replacement.
Decisions, in order
- Run the scale arithmetic and pick a factor.
- Choose a model for the type of footage and pass it explicitly.
- Run a 10 second sample and apply the four gates.
- Estimate disk use from real output frames.
- Run in segments if space is tight, and check each frame folder before rebuilding.
- Review the finished video at full speed, on the screen your audience will use.
A next step
Pick one clip, extract 10 seconds of frames with the command above, and upscale only those. Open the first output frame and read its dimensions to confirm the scale behaves as expected. Put a face or a line of text side by side with the source at full zoom and decide, honestly, whether the new detail is believable. If it is, run the full job in segments. If not, you have saved yourself a long render and a large folder of unusable frames.
Sources
- Real-ESRGAN README: purpose, synthetic training data, portable executables for Intel, AMD, and Nvidia GPUs with no CUDA or PyTorch needed, model list, tile-stitching note,
outscalelimitation, Python and PyTorch requirements. - Real-ESRGAN LICENSE: BSD 3-Clause text.
- Real-ESRGAN ncnn Vulkan README: command-line options, scale values 2, 3 and 4, tile size, output formats, default model text, black-image bug note, driver advice.
- Real-ESRGAN ncnn Vulkan LICENSE: MIT text.
- FFmpeg filters documentation: the
scalefilter and its flags,-fps_mode passthroughin thetilefilter example, and the deinterlacing filtersyadifandbwdif.