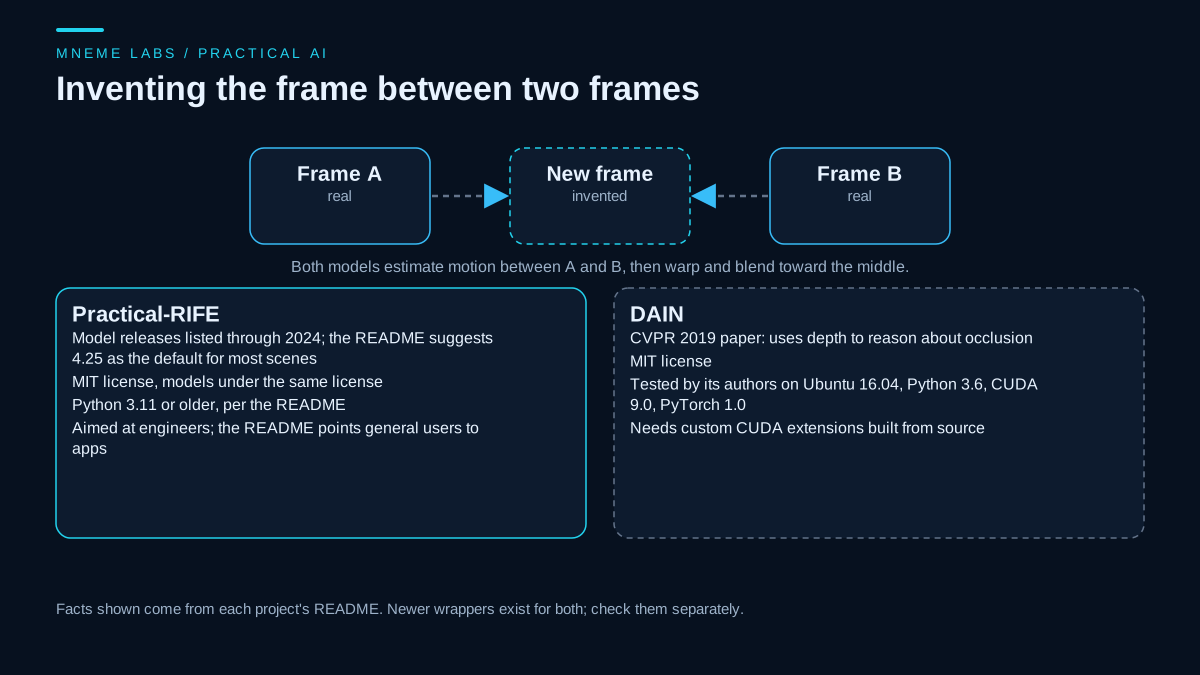
Frame interpolation software invents the frames between the frames you shot. Done well, it turns a choppy pan into a smooth one or stretches a short clip into slow motion. Done badly, it smears limbs, melts text, and blends two unrelated shots into a ghost. RIFE and DAIN are two well-known models for this job, and creators often ask which one to use.
This guide does not crown a winner with a made-up benchmark. It reports what each project's repository states about itself, then gives you a small test you can run on your own clips so the decision rests on your footage. For someone starting today, the setup facts below point to Practical-RIFE as the first one to try. DAIN is better understood as an older research model you might use for comparison.
What each repository says
Practical-RIFE
The Practical-RIFE README says the project builds on RIFE and SAFA and aims to make them more practical by adding features and new models. It states that it is intended for engineers and developers, and it points general users to separate apps. It also remarks that improving PSNR is not consistent with subjective perception, a point that matters for the test later in this guide.
On the practical side, the README lists these facts:
- The code and the linked models are under the MIT license, and the repository's LICENSE file is the MIT text.
- It asks for Python 3.11 or older. Install is a clone, then
pip3 install -r requirements.txt, then downloading a model and placing its files in atrain_logfolder. - At the time of reading, the README recommended model 4.25 as the default for most scenes, with newer entries up to 4.26 and lite variants. Model advice changes, so read the current list.
- The main command takes
--multifor the frame-rate multiplier, or--expas the power of two, plus--scale(the README suggests 0.5 for high resolutions such as 4K),--fpsto set the output rate,--imgto read a numbered PNG folder, and--montageto place the result beside the original.
python3 inference_video.py --multi=2 --video=video.mp4
python3 inference_video.py --multi=4 --video=video.mp4 --scale=0.5
The first command writes a video with doubled frame rate. These commands come from the README and were not run for this article.
DAIN
The DAIN repository describes a CVPR 2019 model that detects occlusion using depth, with a depth-aware flow projection layer that prefers closer objects over farther ones when it builds the in-between flow. The idea is attractive for scenes where a foreground subject crosses a background. The LICENSE file is MIT.
The environment is the catch. The README lists what the authors tested: Ubuntu 16.04.5, Python 3.6.8, CUDA 9.0 with cuDNN 7.0, PyTorch 1.0.0, GCC 4.9.1, and GPUs with compute capability 5.0 to 6.1. It tells you to build PyTorch extensions from source with build scripts, and to edit a setup file if your GPU has a higher compute capability. That is a 2019 stack. Getting it to build on a current machine may mean working through version conflicts, and the README does not promise it will work. Some people run DAIN through other wrappers, and those have their own documentation and licenses to check.
The README does not publish a speed comparison against RIFE, and this guide does not invent one.
A plain comparison
| Question | Practical-RIFE | DAIN |
|---|---|---|
| License stated | MIT, models too | MIT |
| Documented environment | Python 3.11 or older, pip install | 2019 stack, build extensions from source |
| Current model updates | Releases listed through 2024 | Paper and code from 2019 |
| Stated audience | Engineers and developers | Not stated (CVPR 2019 research code) |
| Idea | Direct motion estimation, many model versions | Depth-aware flow projection |
If you want a result this week, start with Practical-RIFE. If you want to see whether depth-aware handling helps a specific kind of shot, set DAIN up as a comparison and keep your expectations low about setup time.
A test that does not depend on trust
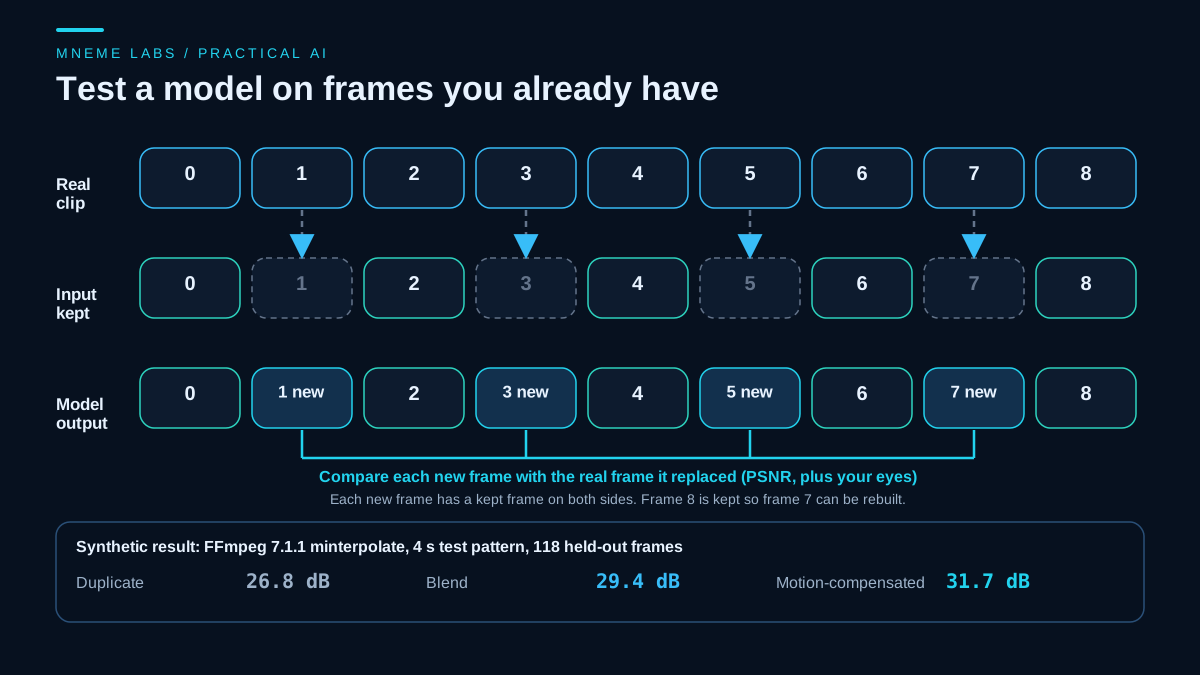
Marketing demos show the best frames. You can build a fairer test from footage you already have. The idea is simple: delete frames you know, let the model rebuild them, and compare the rebuilt frame with the real one.
- Take a short clip, ideally with the motion you care about.
- Remove every second frame to make a half-rate input.
- Run the model at 2x so it rebuilds the removed frames.
- Compare each rebuilt frame with the real frame that was removed.
Mind the end of the clip. Removing every second frame keeps frames 0, 2, 4, and so on. A removed frame can only be rebuilt from the kept frames on both sides of it. If the clip has an even number of frames, the last frame is odd-numbered and gets removed, and no kept frame follows it, so a model has to guess instead of interpolate. The diagram above shows frames 0 to 8 for that reason: frame 8 is kept so that frame 7 has a neighbor on each side. Leave unmatched end frames out of the score, or trim the clip to an odd number of frames before halving.
PSNR is a common score for step 4, and FFmpeg has a psnr filter. Higher is closer to the real frame. The caveat from the Practical-RIFE README applies: a number can disagree with what looks good, so use it to rank candidates and then look at the frames yourself.
The script below does the halving, the scoring, and a scene-cut check using FFmpeg's scdet filter. It runs FFmpeg with argument lists and no shell. The scorer skips any removed frame that has no kept frame on its right, skips any frame missing from the model's output, and prints how many frames it compared.
import re
import subprocess
import sys

QUIET = ["ffmpeg", "-hide_banner", "-nostats"]


def run(cmd):
    result = subprocess.run(cmd, capture_output=True, text=True)
    if result.returncode != 0:
        raise RuntimeError("%s failed (exit %d):\n%s" % (cmd[0], result.returncode, result.stderr[-400:]))
    return result


def frames(path):
    out = run(["ffprobe", "-v", "error", "-select_streams", "v:0", "-count_frames",
               "-show_entries", "stream=nb_read_frames", "-of", "csv=p=0", path]).stdout.strip()
    return int(out)


def halve(truth, out):
    run(QUIET + ["-loglevel", "error", "-y", "-i", truth, "-vf",
                 "select='not(mod(n,2))',setpts=N/(FRAME_RATE/2)/TB", "-c:v", "ffv1", "-an", out])


def score(truth, candidate):
    """Average PSNR over held-out (odd-numbered) frames that had a kept frame on both sides.

    In an even-length clip the last frame is odd-numbered but has no kept frame to its right,
    so a model can only guess it. That frame is left out. So is any frame the candidate lacks.
    Returns (psnr_db, frames_compared, truth_frames, candidate_frames)."""
    t, c = frames(truth), frames(candidate)
    limit = min(t - 1, c)  # compare odd frames n with n < limit
    if limit < 2:
        raise RuntimeError("clips are too short to score")
    keep = "select='mod(n,2)*lt(n,%d)',setpts=N/FRAME_RATE/TB" % limit
    graph = "[0:v]%s[a];[1:v]%s[b];[a][b]psnr" % (keep, keep)
    err = run(QUIET + ["-i", truth, "-i", candidate, "-filter_complex", graph, "-f", "null", "-"]).stderr
    m = re.search(r"PSNR.*average:(\S+)", err)
    if not m:
        raise RuntimeError("no PSNR line in FFmpeg output")
    return float(m.group(1)), limit // 2, t, c


def cuts(clip, threshold="10"):
    out = run(QUIET + ["-i", clip, "-vf", "scdet=threshold=%s,metadata=print:file=-" % threshold,
                       "-an", "-f", "null", "-"]).stdout
    return [float(t) for t in re.findall(r"lavfi\.scd\.time=([0-9.]+)", out)]


if __name__ == "__main__":
    cmd = sys.argv[1] if len(sys.argv) > 1 else ""
    if cmd == "halve" and len(sys.argv) == 4:
        halve(sys.argv[2], sys.argv[3])
    elif cmd == "score" and len(sys.argv) == 4:
        db, used, t, c = score(sys.argv[2], sys.argv[3])
        print("PSNR on %d held-out frames: %.2f dB (truth %d frames, candidate %d frames)" % (used, db, t, c))
    elif cmd == "cuts" and len(sys.argv) in (3, 4):
        print(cuts(*sys.argv[2:]))
    else:
        sys.exit("usage: halve truth out | score truth candidate | cuts clip [threshold]")
Run the halving step on a lossless or high-quality copy of your clip. Feed the half-rate file to each model, with the same settings you would use for real work. Then score each output against the original. The scorer matches frames by number, so the output must start at the same first frame as the original and keep the same frame order. The end can differ, because a model may return a few frames fewer or more than the original. The scorer stops at the frames both files have and prints both frame counts, so you can see how much it compared. If the counts differ by a lot, the frames are probably misaligned and the score is not meaningful.
What this script showed on synthetic clips
To confirm the test behaves sensibly, it was run on two FFmpeg test sources (a test pattern and a Mandelbrot zoom, each 4 seconds at 60 frames per second, 240 frames) using FFmpeg 7.1.1's built-in minterpolate filter in three modes. Repeating the previous frame scored 26.8 dB on the test pattern and 24.7 dB on the zoom. Blending two frames scored 29.4 and 26.6 dB. Motion-compensated interpolation scored 31.7 and 27.5 dB. The ordering was the same on both clips, which is what a working test should show. Each score covers 118 of the 120 removed frames. Frame 239 has no kept frame on its right, and FFmpeg's output ended at 236 frames, so the last two removed frames were left out. Separate checks on 8 and 9 frame clips confirmed that a damaged frame 7 is ignored when the clip ends at frame 7 and counted when frame 8 exists. These numbers describe synthetic patterns and an FFmpeg filter. They say nothing about RIFE or DAIN, and nothing about your footage. The point is the method.
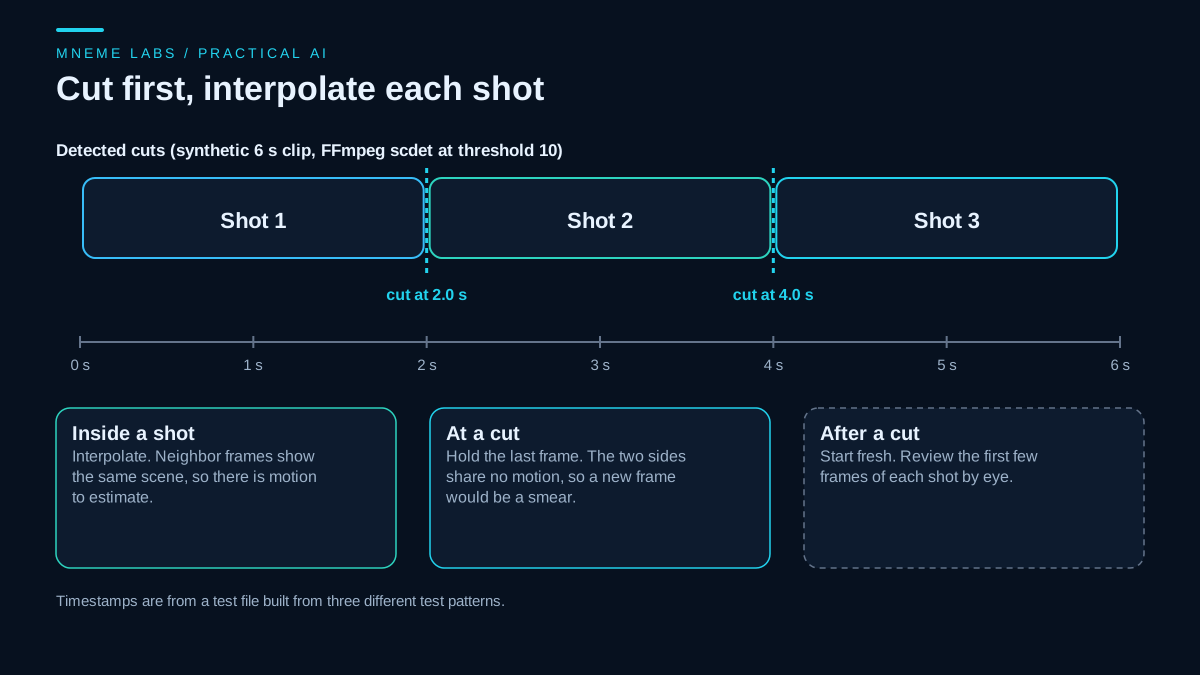
The scene-cut check was run on a 6-second file built from three different test patterns, and it reported cuts at 2.0 and 4.0 seconds, where the patterns changed. FFmpeg's documentation says good scdet thresholds usually fall between 8 and 14, so check a few values on real footage.
Cuts, fast action, and other failure cases
Scene cuts. A model asked to invent a frame between the last frame of one shot and the first frame of the next has no motion to estimate. The result is usually a smeared blend. Detect cuts, split the clip at those times, interpolate each shot, and hold the last frame at the join. This is a pipeline decision, so make it before you process anything.
Fast motion. When something moves a long way between frames, the model has to guess a position it never saw. Expect distortion around fast arms, swinging objects, and spinning wheels. If an artifact appears only in these sections, mask them: keep the original frames there and interpolate the calm parts.
Repeating patterns and fine detail. Fences, text, and thin lines can warp, because matching them between frames is ambiguous. Titles and on-screen graphics are better added after interpolation.
Content shot on a different timing. Animation often holds each drawing for more than one frame. Interpolating it changes how the motion feels, not just how smooth it is, so check that the result still looks like the style you intended.
Frame rate targets that are not a multiple. A 2x run turns 24 into 48. Reaching 60 needs another conversion step, and FFmpeg's fps filter documents that it does this by duplicating or dropping frames. That step can add judder, so decide on a delivery rate before you pick a multiplier.
Slow motion. If you play the interpolated frames at the original rate, the clip lasts longer and looks slower. The audio does not stretch with it, so plan for the sound separately, and expect to pair slow motion with shots that were filmed with a fast shutter, since blurry source frames produce blurry in-betweens.
Decisions, in order
- Pick the delivery frame rate first.
- Run the cut check and split the clip.
- Try Practical-RIFE with the documented 2x command on one shot, on a clip that includes your hardest motion.
- Score a held-out version of that clip with the script, then watch the output at full speed and frame by frame.
- If you suspect depth boundaries are the problem, set up DAIN on the same clip and compare the same frames.
- Keep the original frames wherever interpolation fails visibly.
A next step
Choose a 5 to 10 second clip with one hard moment, such as a hand crossing a face or a quick pan. Make the half-rate version, run Practical-RIFE on it, score the result against the original, and write down the frame numbers where it breaks. That short list is worth more than any general ranking, and it tells you whether to use the output as is, mask part of it, or leave the clip at its original rate. For the next step in a local video chain, see the guide to upscaling with Real-ESRGAN, and for subtitle work on the finished video, the Whisper caption guide.
Sources
- Practical-RIFE README: audience, MIT statement, Python limit, install, model recommendation, command options, PSNR caveat.
- Practical-RIFE LICENSE: MIT text.
- DAIN README: CVPR 2019 description, depth-aware flow projection, tested environment, build steps.
- DAIN LICENSE: MIT text.
- FFmpeg filters documentation:
minterpolatemodes,scdetthreshold guidance,psnr, andfpsbehavior.