Removing a background from a still photo is a solved problem for many tools. Video is harder, because a mask that looks fine on one frame can flicker on the next. Hair shimmers, fingers vanish, and edges crawl. Robust Video Matting, usually shortened to RVM, was built to reduce that problem for footage of people, and you can run it on your own computer.
This guide walks through a local workflow: run RVM, turn its two outputs into a clip with a real alpha channel, composite onto a new background, and inspect the result. It also covers where the method breaks, because a cutout that is wrong in a few frames is more distracting than no cutout. If the rest of your pipeline also runs locally, the same mindset applies to upscaling with Real-ESRGAN and frame interpolation.
What RVM does and what it does not
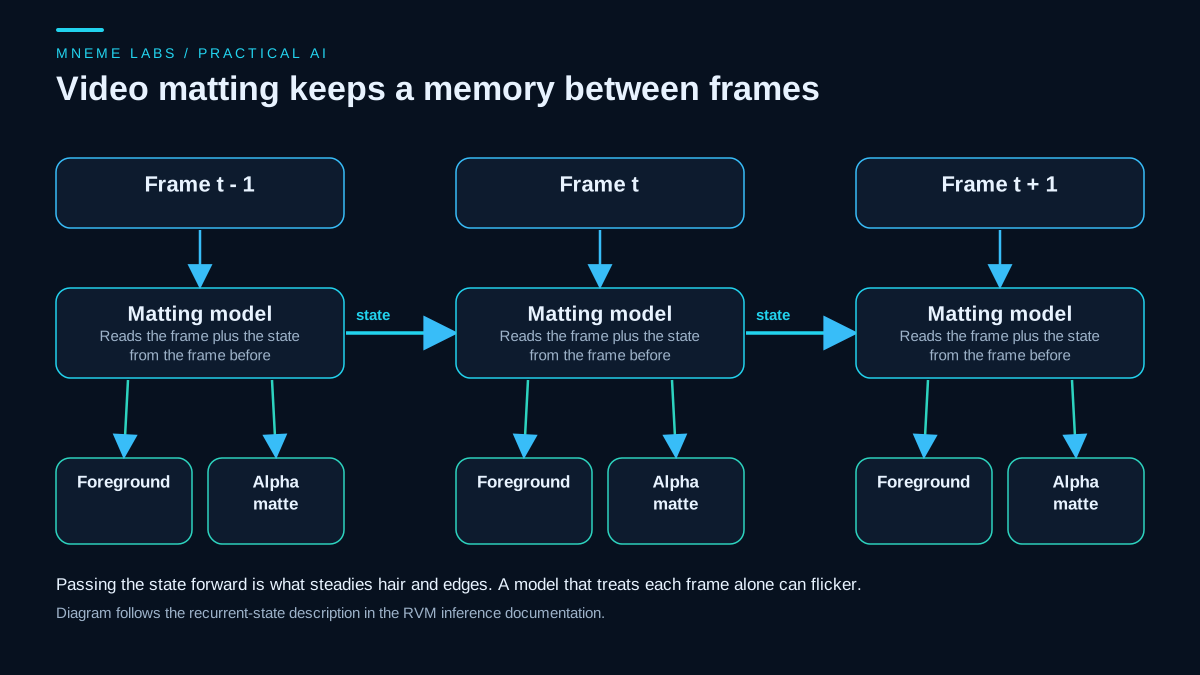
The RVM repository describes the model as designed specifically for human video matting. It processes video with a recurrent neural network that keeps a temporal memory, instead of treating each frame as an unrelated image. The authors report real-time matting on an Nvidia GTX 1080 Ti. That figure comes from the authors, on one card and their test material, so treat it as a sign that the model is light, not as a speed you will see.
Two limits follow from that description. First, the model targets people. A product on a turntable, a pet, or a car is outside what it was designed for, so test before you plan around it. Second, the recurrent design only helps if you feed frames in order. The inference documentation is explicit: you must process frames sequentially and pass the recurrent states from one frame to the next. Running frames as separate images, which the docs call the wrong way, discards the memory that makes the model stable.
Check the license first
The repository's README says the code was re-released under the GPL-3.0 license, and the LICENSE file is the GNU General Public License version 3 text. The README does not make a separate statement about the pretrained weights, so read the repository yourself before you build RVM into a product that you distribute. Using it to process your own footage is a different situation from shipping it inside software, and the difference matters under the GPL. For a client project or a commercial tool, ask someone qualified to read the license for your case.
Set up and run
The README gives the install path: clone the repository and install its inference requirements.
git clone https://github.com/PeterL1n/RobustVideoMatting.git
cd RobustVideoMatting
pip install -r requirements_inference.txt
The README links the pretrained PyTorch weights, rvm_mobilenetv3.pth and rvm_resnet50.pth, on the repository's release page. It recommends the MobileNetV3 model for most uses and describes ResNet50 as the larger variant with small performance improvements. Start with MobileNetV3, and move to ResNet50 only if your test clip shows edge problems that the lighter model cannot fix.
The inference documentation shows a command-line form of the converter:
python inference.py \
  --variant mobilenetv3 \
  --checkpoint rvm_mobilenetv3.pth \
  --device cuda \
  --input-source input.mp4 \
  --downsample-ratio 0.25 \
  --output-type video \
  --output-composition composition.mp4 \
  --output-alpha alpha.mp4 \
  --output-foreground foreground.mp4 \
  --output-video-mbps 4 \
  --seq-chunk 12
The same documentation shows that convert_video accepts a model on any device, CPU or CUDA, so a machine without a supported GPU can run it, only slowly. The Python API also accepts output_type='png_sequence', which writes image files into a directory instead of a video. The RVM commands here come from its documentation and were not run for this article, because installing a model and its weights was outside the scope of the check. The FFmpeg code later in the guide was run on synthetic clips.
Choose a downsample ratio
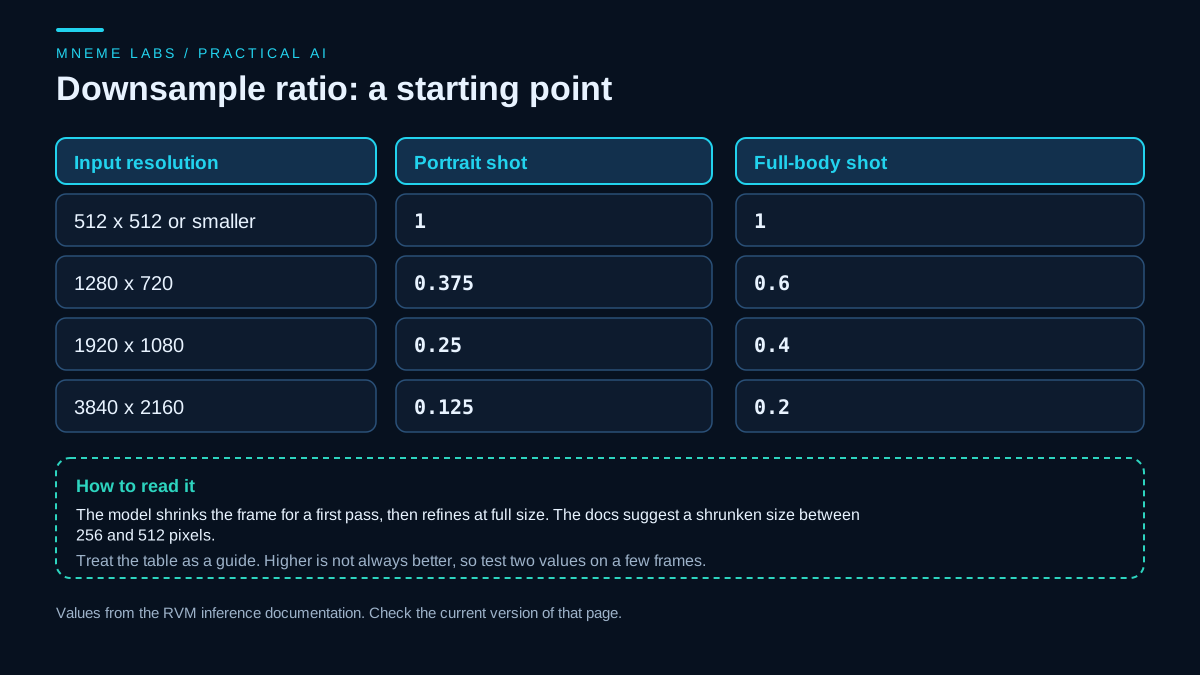
The most important setting is downsample_ratio. The documentation explains that the model shrinks the input for a first stage and refines at full resolution in a second stage. It suggests picking a ratio so the shrunken frame lands between 256 and 512 pixels, and it gives a starting table: for 1920 by 1080, 0.25 for a portrait shot and 0.4 for a full-body shot; for 1280 by 720, 0.375 and 0.6; for 3840 by 2160, 0.125 and 0.2. It also notes that a higher ratio is not always better. Leaving the value unset makes the converter cap the shrunken size at 512 pixels.
What you get: three outputs, none with alpha built in
The converter can write three files: a composition, an alpha matte, and a foreground. The composition is a quick preview with the subject over a plain background. The alpha file is a grayscale video where white means subject and black means background. The foreground file holds the subject's colors. None of the three is a single video with transparency, so you combine the foreground and the alpha yourself. FFmpeg's alphamerge filter does that: its documentation describes adding or replacing the alpha of the first input with the gray values of the second.
The wrapper below runs FFmpeg with argument lists instead of a shell string, checks that the two inputs have the same size, merges them into a lossless intermediate that supports alpha, and composites the result on a new background image.
import json
import subprocess
import sys


def run(cmd):
    result = subprocess.run(cmd, capture_output=True, text=True)
    if result.returncode != 0:
        raise RuntimeError("%s failed with exit code %d:\n%s" % (
            cmd[0], result.returncode, result.stderr[-500:]))
    return result.stdout


def probe(path):
    out = run(["ffprobe", "-v", "error", "-select_streams", "v:0",
               "-show_entries", "stream=pix_fmt,width,height,avg_frame_rate", "-of", "json", path])
    return json.loads(out)["streams"][0]


def make_alpha_master(foreground, alpha, out_mkv):
    fg, pha = probe(foreground), probe(alpha)
    if (fg["width"], fg["height"]) != (pha["width"], pha["height"]):
        raise ValueError("foreground and alpha sizes differ")
    run(["ffmpeg", "-y", "-hide_banner", "-loglevel", "error",
         "-i", foreground, "-i", alpha,
         "-filter_complex", "[0:v][1:v]alphamerge",
         "-c:v", "ffv1", "-pix_fmt", "yuva444p", "-an", out_mkv])
    if not probe(out_mkv)["pix_fmt"].startswith("yuva"):
        raise RuntimeError("output has no alpha channel")


def composite(alpha_mkv, background_image, out_mp4):
    info = probe(alpha_mkv)
    w, h = info["width"], info["height"]
    graph = ("[0:v]scale=%d:%d:force_original_aspect_ratio=increase,crop=%d:%d[bg];"
             "[bg][1:v]overlay=shortest=1:format=auto,format=yuv420p" % (w, h, w, h))
    run(["ffmpeg", "-y", "-hide_banner", "-loglevel", "error",
         "-loop", "1", "-framerate", info["avg_frame_rate"],
         "-i", background_image, "-i", alpha_mkv,
         "-filter_complex", graph, "-c:v", "libx264", "-crf", "18", "-an", out_mp4])


if __name__ == "__main__":
    if len(sys.argv) != 5:
        sys.exit("usage: matte_tools.py foreground.mp4 alpha.mp4 background.png out.mp4")
    make_alpha_master(sys.argv[1], sys.argv[2], "subject-alpha.mkv")
    composite("subject-alpha.mkv", sys.argv[3], sys.argv[4])
This was tested with FFmpeg 7.1.1 on synthetic material: a test-pattern clip as the foreground and a moving white circle as the matte. The merged file reported an alpha range of 0 to 255. In the final video, an 8 by 8 patch outside the circle matched the background image's brightness exactly, and a patch inside the circle matched the foreground. A second run with mismatched sizes stopped with the expected size error. That shows the plumbing is correct. It does not show that RVM's matte on real footage is good, which only your own eyes can judge.
Keep the original audio
The RVM foreground and matte do not carry the source soundtrack. Both wrapper outputs deliberately use -an, so the composite is silent. The wrapper sets the background input rate from the foreground's average frame rate; this example assumes constant-frame-rate footage. It does not preserve arbitrary variable-frame-rate timing. Check duration and lip sync against the original before delivery.
If the composition still starts at the same time and runs at the same speed as the source, attach its original audio in a separate step:
ffmpeg -i composite.mp4 -i input.mp4 -map 0:v:0 -map "1:a:0?" -c:v copy -c:a aac -shortest final-with-audio.mp4
The first file supplies the finished picture; input.mp4 supplies the first audio stream if one exists. A source with no audio still produces a silent result. The optional mapping does not fix a trimmed, retimed or offset picture. Those need explicit alignment in an editor before muxing. This mux command was checked with a synthetic video and tone, including a source without audio; it was not an end-to-end RVM test.
A warning about ProRes handoff
Editors often want ProRes 4444 for alpha. In the same synthetic test, the merge itself was clean, but a ProRes 4444 export read back through FFmpeg showed alpha values from about 6 percent to about 92 percent of full scale instead of 0 to 100 percent, while the lossless FFV1 file kept the full range. The cause may be how FFmpeg's ProRes encoder and decoder map alpha. Whatever the reason, do not assume an alpha export is right. Import the file into your editor, place it over a bright solid color, and look for a faint ghost of the old background or a subject that is slightly see-through.
A worked example
Take a hypothetical 40-second product demo shot at 1080p. One presenter sits at a desk with a cluttered shelf behind them, and the plan is to replace the shelf with a plain branded backdrop.
- Run MobileNetV3 with a downsample ratio of 0.25, the documented starting point for a portrait at 1080p, and write the composition, alpha, and foreground files.
- Watch the composition preview at full speed, then step through the hand gestures frame by frame. Hands are the first thing to break.
- If edges look soft, try a second run at a different ratio, and compare the same ten frames side by side. Keep the better one.
- Merge foreground and alpha with the wrapper, composite onto the backdrop, and check the corners and the shoulder line for halos.
- Reattach the original audio, verify duration and lip sync, and watch the final MP4 on a phone as well as a monitor.
If step 2 shows hands breaking, the fix is usually in the source clip, not in the settings.
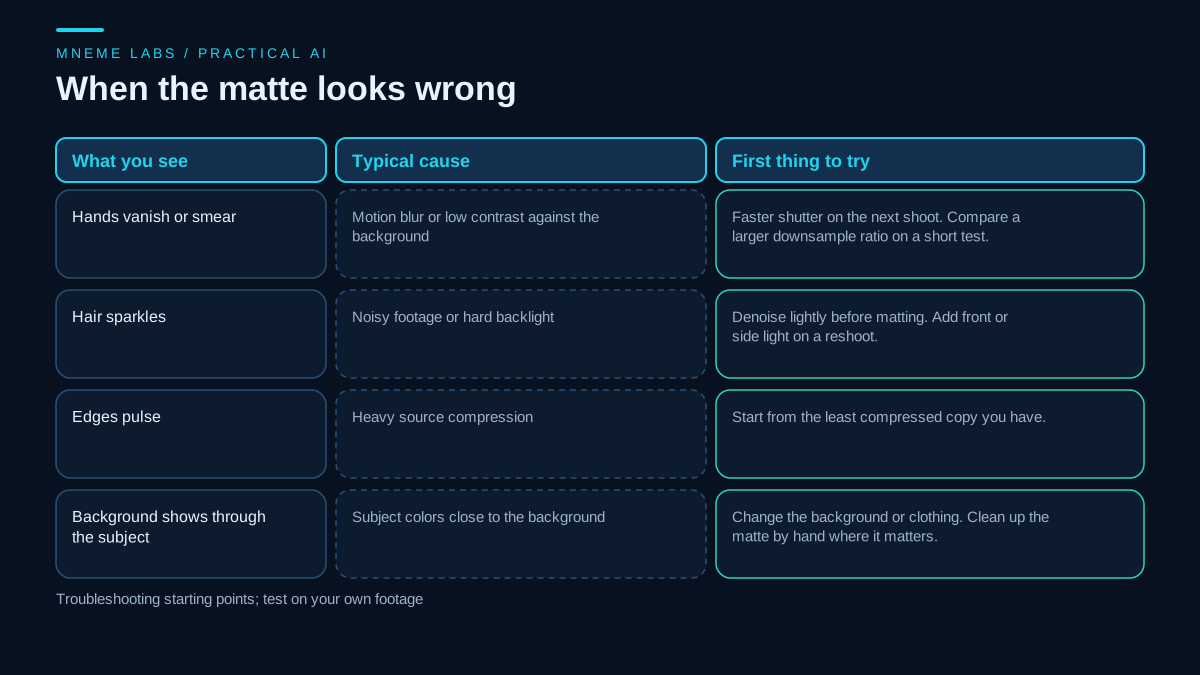
Where matting fails, and what to do instead
The failures below are patterns to check for. The causes are troubleshooting starting points, not statements from the RVM documentation, and RVM itself was not run for this guide, so test each one on your own footage.
- Fast hands and hair. Motion blur removes the edge the model needs. A faster shutter on the next shoot helps more than any setting.
- Subject colors close to the background. A gray jacket on a gray wall gives the model little to separate. Change the backdrop or the clothing.
- Glass, smoke, and thin transparent objects. A matte is meant to give each pixel an alpha value, but a model trained on people is not built for a glass of water. Expect problems.
- Heavy compression in the source. Blocky edges in the input become unstable edges in the output.
- Non-human subjects. The model is built for people, so test small before promising a result.
If you control the shoot, a green or blue screen with FFmpeg's chromakey or colorkey filter is a different route, and the same documentation lists a despill filter for removing the reflected screen color from the subject. Keying has its own limits, such as green spill on hair and shiny surfaces, but it gives you a predictable, tunable result where AI matting gives a guess. For a recurring series, a cheap backdrop can beat a model.
Decisions to make before you start
- Preview or final? Use the composition file to judge feasibility. Build the final from foreground plus alpha so the background can change later.
- Lossy matte or lossless matte? The alpha video from the
videooutput type is compressed. For the cleanest edges, thepng_sequenceoutput type avoids that step. This guide did not test that path. - Who needs the file? If an editor needs transparency, test their application on a short sample before you process the whole library.
- Is the license acceptable? Settle that before the project grows, not after.
A next step
Pick one clip with a single person in decent light, run it with the documented 0.25 ratio at 1080p, and keep all three outputs. Merge them with the wrapper, composite on a plain color, and scrub the result at slow speed. Write down the frames where it fails and what the source looked like there. That list tells you whether the model, a reshoot, or a keyed green screen is the right tool for this kind of footage.
Sources
- Robust Video Matting repository README: human matting design, recurrent memory, GPL-3.0 re-release statement, model recommendations, install path, weights links,
convert_videooptions and output types. - RVM inference documentation: downsample ratio table and rule of thumb, sequential frames and recurrent states, command-line flags, CPU or CUDA device.
- RVM LICENSE file: GNU General Public License version 3 text.
- FFmpeg filters documentation:
alphamerge,alphaextract,overlay,chromakey,colorkey, anddespill.